

Focus Stacking in Photoshop — Step-by-Step Guide
- Miriam Hrebendová
- Feb 7, 2024
- 5 min read


In the previous article, I delved into what focus stacking is, its benefits, and how to proceed with its shooting, regardless of whether your camera has the option of automatic focus bracketing or not. However, capturing individual frames for focus stacking correctly is only half the job. It's also crucial to know how to effectively assemble these photos to achieve satisfactory results. Often, even when the photos are taken correctly, issues like focus breathing can lead to blurry areas around objects and similar errors, which can be rectified only through proper post-processing. In this second article about Focus Stacking, we will take a detailed look at how to deal with the merging of focus stacking as easily and quickly as possible.


Before and after focus stacking
Software for Focus Stacking merging
There are several software options available for merging focus stacking images efficiently. Perhaps the most well-known are Adobe Photoshop and Helicon. Personally, I prefer Adobe Photoshop, as I process my photos from start to finish in this software. In this article, we will focus on how to effectively assemble photos in Photoshop. The word Photoshop is synonymous with complexity for many, but that is not the case, especially for focus stacking. It can be accomplished with just a few clicks in Photoshop. Let's take a look at how to do it.
How to Focus Stacking in Photoshop?
Step 1:
Open Adobe Photoshop. First, we need to choose which photos we want to merge into focus stacking. In the software, we have to open them as layers. Simply put, they need to be opened in one tab, as if we were placing several sheets of paper on top of each other, which Photoshop will then align and merge. In the top-left corner, click on File - Scripts - Load Files into Stack.

Step 2:
A window will appear, where you can use the Browse button to select the photos you want to merge for focus stacking. Be careful to choose the correct photos so that you don't miss any or add any extra ones. In such a case, the software would find it challenging to merge the photos effectively. To ensure I select the right photos, I usually take a precaution during shooting. After each focus stacking session, I take a photo with the lens cap on or my hand in front of the lens. This way, I don't lose track of series of photos, and I immediately know which ones I want to stack. Some cameras with automatic focus stacking options allow you to save each focus stacking series into separate folders. This is also a helpful tool to avoid getting lost in your photos.

When you have selected the photos you want to merge, confirm your choice with the OK button. Subsequently, the chosen photos will open as layers.

Step 3:
You will see the individual photos opened in Photoshop as layers at the bottom right. As the next step, it is necessary to select all the layers. You can do this by holding Ctrl (Command for Mac) and clicking on each layer until all are highlighted.

Step 4:
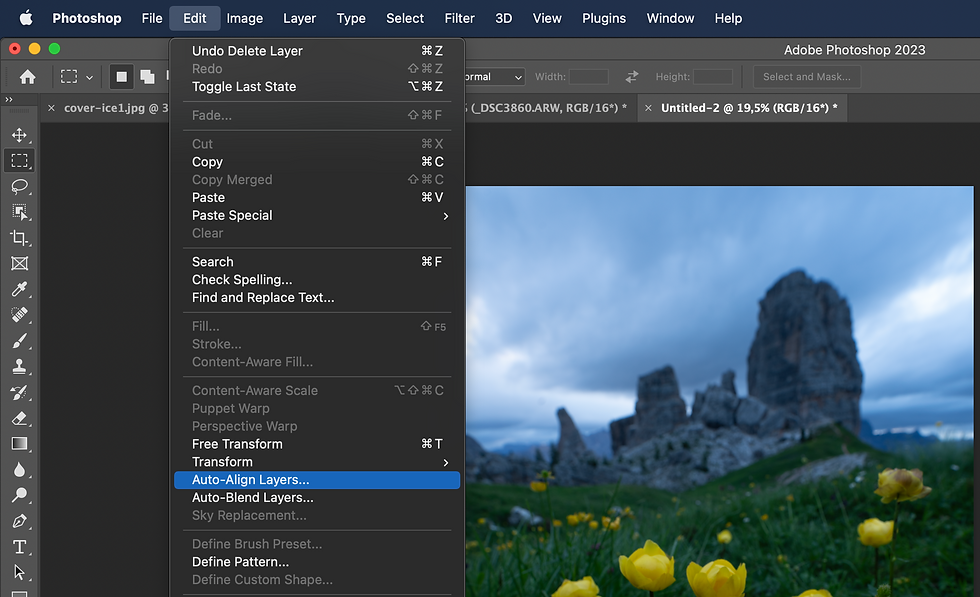
Another crucial step is aligning the photos. Even if you used a tripod, slight movements may occur due to a poorly tightened tripod head or similar influences. Most lenses also have an undesirable characteristic called "focus breathing," causing a slight change in focal length during focusing. All these discrepancies need correction to ensure proper overlap of all objects in the photo. This is crucial for effective merging. Fortunately, Photoshop has a straightforward automatic tool for this. With all layers selected, click on Edit - Auto Align Layers. This automatically aligns all layers based on the objects in the photos. In the subsequent dialog box, simply click OK.

Step 5:
Once the photos are correctly aligned, the actual focus stacking process follows. Click on Edit - Auto Blend Layers. In the dialog box that opens, choose the option "Stack Images." There are also two checkboxes in the settings that should not be ticked, as they could affect the exposure and color of the resulting photo.

You can see the entire process briefly in this short video, which demonstrates that it is indeed a quick procedure:
Correction of Focus Stacking Issues
And there it is. At this point, you should have your focus stacking. However, you may have noticed that not all parts of the photo are merged correctly, and there are some image issues. Therefore, these issues need to be corrected before you delve into the actual photo editing.
Issue 1: Incorrectly merged “Maps” in the Photo
These "maps" result from the photo being dark or simply because Photoshop incorrectly identified all areas in the photo. How to correct such an issue?

Firstly, it's important to identify which of the masks has an issue. Then, select the brush tool in the left toolbar, choose white color from the palette below, and paint into the mask of the layer where the object is correctly focused the area that was incorrectly blended. You can see the process in this brief video:
Issue 2: Unsharp Edges
The most common problem you'll encounter with focus stacking is imperfect edges created due to Auto Align. You can easily crop or stretch these edges using the Edit - Transform - Distort tool.

Here's how you can effortlessly remove unsharp edges using the Distort tool:
Issue 3: Unsharp Areas Around Prominent Foreground Objects
Another problem that arises when shooting prominent foreground objects is the blurring of their surroundings. Again, this is a consequence of focus breathing.

The solution to this problem is somewhat more complicated but not impossible. First, you need to merge all the layers by selecting them all, right-clicking, and choosing the "Merge Layers" option. Then, using the Object Selection tool on the left, choose the object whose surroundings you want to fix. Right-click on the selection and choose "Select Inverse." This will highlight the surroundings of the object. In the left panel, select the Stamp tool, which allows you to transfer image information and pixels from one place to another. Hold down Alt (or Option on Mac) and click on the area from which you want to remove image information. Then, without holding Alt/Option, transfer it to the edges of the object you want to fix. Repeat this process for all objects you want to correct.
You can see the procedure in the following video:
Summary
Focus stacking is an excellent method that allows you to elevate the quality of your photography to a whole new level. Just follow a few principles outlined in these two articles. I believe they helped make your photography even more enjoyable and enabled you to achieve better results.
You can try out these and other techniques with the assistance of our professional guides directly in the field at the most beautiful locations on the planet! Join us on one of our upcoming photo tours:


Comments